

How Fo Repair Wood House Siding Before Painting
Painting Forest Siding Tips and Preparation
Updated: Mar. 31, 2022
Prep tips and techniques for forest siding and trim
In the long run expert pigment preparation techniques add years to an exterior paint job—including cleaning, scraping, filling, caulking and priming. Y'all relieve time and money.
You might likewise like: TBD
Video: Use a Plastic Liner to Keep a Clean Paint Bucket
Overview: Good prep means less painting

Filling gaps and holes
Proper prep before painting will make the chore final longer. It saves y'all fourth dimension and money in the long run.
Tired of your paint job peeling when it's only two years old? Paying shut attention to the prep piece of work can add years to the life of your finish coat of paint. In this article, we'll give you tips and techniques on cleaning, scraping, filling and priming before painting woods siding. We'll too assistance you place and solve some specific bug that may have caused your house paint to fail prematurely.
Applying the paint is easy. But creating a sound, dry surface for the new coat of paint is tough and time consuming. Even so, it's the fundamental to whatever successful exterior paint job.
Painting Wood Siding Tip i: Pressure washers make clean deep and fast

Painting Wood Siding Photo 1: Pressure launder to remove dirt
Pressure washing removes loose paint and built-up grime and improves pigment adhesion. Use the high pressure carefully, peculiarly around windows. Loftier-pressure level h2o can break the drinking glass. Avoid directing h2o upward under the laps, and continue the nozzle at least 16 in. away from the wood.
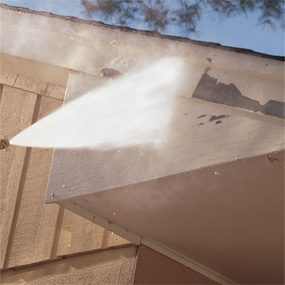
Painting Woods Siding Photo 2: Pressure wash to remove paint
Some loose pigment will bit off while you launder the surface. Merely don't try to strip the paint—you'll gouge the wood.
Paint just won't stick to muddied or dusty surfaces. You'll need to clean it even if there's very little scraping to do, and the fastest way is with a pressure washer. Y'all can rent a pressure washer (Photo 1) from a rental store and get a lot of loose paint and crud off your erstwhile painted surfaces fast.
These washers kicking out a hard stream of water, and so endeavor it out on an inconspicuous spot on the house to get the hang of handling the wand. When pressure level washing a house, be conscientious not to hit windows (they can break), and don't work the spray upward nether the laps of siding. Remember, this is for cleaning, not blasting all the one-time paint off. Of course, some of the erstwhile loose pigment will fall off, but also much pressure level will gouge the wood.
Don't endeavor to pressure-wash while continuing on a ladder. The recoil tin knock you off remainder. And finally, proceed in mind that you won't be able to do any scraping and sanding for a couple of days until the surface dries thoroughly.
If the prospect of using a pressure washer is just besides intimidating, you can get a stiff castor on a pole and a bucket with mild detergent and scrub the surfaces. Follow the scrub immediately with a rinse from your garden hose.
Caution
Lead Paint Caution: Houses congenital before 1978 may contain lead paint. Before disturbing whatever surface, get a lab assay of paint chips from it. Contact your local public health section for information on how to collect samples and where to send them.
Painting Wood Siding Tip 2: Keep your scraper precipitous

Photo 1: Scrape with the grain
Follow the grain of the wood with long strokes. If nails are sticking upward, pound them in. If the smash won't stay put, pull it and bulldoze a new galvanized nail 1/2 in. away.

Photo two: Keep your scraper abrupt
Pull down firmly with a precipitous scraper to remove loose paint. Remember, you don't demand to remove all the pigment, just the stuff that flakes away with the scraper. Go along your scrapers sharp with a fine file. Tip: Don't scrape wet woods. You'll tear away the fibers and dig deep gouges into the woods.

Photo 3: Use small-scale scrapers too
Get into tight areas with a small ane-in. scraper. Heavy buildup of paint in corners volition somewhen scissure and let moisture in. Scrape and cut excess pigment out of the corners with a abrupt putty pocketknife.

Photo iv: Scrape out onetime caulk
While you're scraping, dig out any loose caulk around doors, windows and trim. Erstwhile, stale-out caulk loses its elasticity and will usually crack later. If your caulk is sound and adhering well, leave it in place.
Former, flaking pigment must be scraped from your wood surface or your new paint will eventually let go. Make certain the surfaces are dry. And so scrape in the direction of the grain to avoid tearing the wood fibers and creating an unstable surface for your primer. A sharp scraper is the all-time. You tin buy hardened steel scrapers (Photo one), or for about twice the cost, y'all can buy carbide scrapers (Photo 2).Good-quality scrapers all have replaceable blades. Yous can easily sharpen a steel scraper blade using a fine metal file. The carbide blades final up to 10 times longer but must be sharpened with special tools. Purchase replacement blades to have on hand.
Painting Wood Siding Tip iii: Fill large gouges before priming

Photo ane: Fill holes
Overfill each wood siding repair so shape it, once it has prepare, with a file, sharp chisel and sandpaper. Blemishes deeper than i/two in. will demand additional applications. Once the patch is dry out, shaped and sanded, prime it to protect it from wet.
Before painting forest siding, fill big holes and gouges with a two-part resin filler such every bit Minwax High Operation Wood Filler. You have to mix these setting types of fillers, but they stick better to wood than other fillers. Remove any paint around the area earlier filling. Yous can make full boom holes with them besides.
For modest, shallow blemishes, use an outside spackling chemical compound. Cracks can be filled with exterior caulk subsequently priming.
Painting Woods Siding Tip 4: Sand the ridges

Photo 1: Smooth paint edges
Plume the edge of your scraped areas with a power sander to get rid of sharp edges. These ridges tin can break the finished paint surface later and allow moisture to get behind the paint. After sanding (use 80 to 100 dust), utilise a dry brush to whisk away whatsoever surface grit, especially on horizontal surfaces similar windowsills.

Photograph 1A: Ability sanders
Orbital and random orbital sanders tin can do a lot of smoothing work fast with 60-grit paper
Power sanders cutting fast. Use a 60-grit newspaper for heavy ridges followed by 100-dust for a smooth look. Also sand shiny, erstwhile paint surfaces to give the topcoat better seize with teeth. Tip: Sand all old, bare wood. Paint won't stick to wood once information technology has weathered.
Video: How to Prep and Paint a Room
We'll evidence you how to prep and paint the walls in any room in just one morning – including all that messy clean-up. Your results will rival any painting chore done past a pro.
Painting Wood Siding Tip 5: Utilise a stain-blocking primer
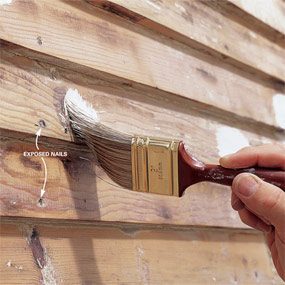
Photograph one: Spot prime get-go
Spot-prime nailheads and knots with a special stain-blocking primer to forbid unsightly bleed-through from rust or wood resin. A pigmented shellac (BIN, for example) is a good production for this use.

Photograph ii: Prime number all bare wood
Work the primer into cracks and especially where trim pieces come across siding. Even out the primer with long brush strokes and check for drips. Remember to piece of work the primer under the siding laps and into tight spaces and hard-to-meet spots. Surfaces that still have old paint that's adhering well don't need a primer.
You can choose either an oil or a latex primer and get bang-up results. Oil primers, notwithstanding, are more often than not more effective on new wood, metal and previously chalked surfaces. If you lot're priming over blank forest that have a high tannin content, such every bit cedar and redwood, inquire your paint supplier for a special stain-blocking outside primer.
Stain-blocking primers will forestall a "bleed-through" of tannin through the primer and the topcoat and stop onetime, rusty nailheads from bleeding through every bit well (Photo 1).
Always try to avert priming or painting wood siding in direct sun. The extra oestrus can dry the primer and paint too quickly and prevent adequate penetration. It tin besides cause oil paints to develop blisters that'll ruin the skin of the stop glaze of pigment. Tip: Your paint supplier can add together paint to your primer to get it shut to the topcoat color. This is especially helpful when your topcoat is a darker colour. You may be able to comprehend the primed surface area and one-time pigment surface with one coat of pigment.
Painting Wood Siding Tip 6: Caulk cracks to keep out moisture

Photo 1: Caulk seams and cracks
Caulk all the seams and cracks one time yous've primed the surface to keep out moisture and hide unsightly nighttime lines. Wipe excess acrylic caulk and shape it with a moist rag as you utilise it. Permit the caulk gear up (commonly a couple of hours) before painting over information technology.
With all the caulks available at habitation centers and pigment supply stores, information technology tin can be hard to know what kind of caulk to buy to seal gaps. Most professionals agree that acrylic caulk and siliconized acrylic caulk are the best for caulking around windows and doors and confronting corner boards. These caulks are paintable, long lasting and easy to make clean up.
Caulk subsequently priming. The caulk sticks best to a primed surface. Clasp plenty caulk into the gaps to go a smooth bead that fills the void. Excess caulk will look sloppy and will but increase the possibility of working loose over time.
Diagnose Common Paint Issues:
Poor Prep and Excess Moisture
Take a skillful look at your business firm before y'all outset painting. You may have to correct some of the wrongs that the previous painter overlooked in desiring to get the job done fast. You may have peeling paint as shown in Figures A – C.
Poorly prepared surface
You may find the finished coat of paint peeling away from another coat underneath (Figure A). This is the result of painting over a poorly prepped surface. Usually the surface wasn't cleaned before painting or the primer coat was left as well long before the finish coat of paint was practical. You tin remedy this state of affairs by firmly scraping away the paint to become at the surface below. Scrape until you lot become down to a solid surface that may exist part bare wood or a sound, previously painted surface. Sand and make clean the surface thoroughly, let it dry, and prime all bare wood and spot-prime whatever small bare spots.
Excess moisture
Sometimes you discover paint and primer falling abroad from the blank woods surface (Effigy B). This is most probable caused past water getting behind the wood or even moisture from the home'south interior. You can't repaint here unless you stop the source of the moisture migrating through the walls, especially from bathrooms and kitchens. Calculation ventilation such as an exhaust fan in the room tin oft help the problem. Many older homes have no vapor barrier, but sometimes applying a vapor barrier paint on the inside volition exercise the trick. If you're stymied, consult a building contractor to assist you lot solve the problem. Then scrape and sand to remove the loose pigment.
Alligatoring
Another mutual problem is cross-grain groovy, sometimes referred to as "alligatoring." The source of this trouble is usually paint buildup from several layers of oil-based paints. Unfortunately, there'due south no magic bullet for this set. Yous'll have to scrape off all the old paint down to blank wood then sand the surface. Take precautions and get together this paint onto drop cloths or plastic for disposal considering it may contain pb. Don"t continue applying layers of paint to areas that don't need it such as porch ceilings and eaves where the surfaces are protected. Often a good cleaning is all they demand.
Other problems
You may find dark mildew spots on the finished coat of paint along shady areas of the house. Buy a special cleaner at paint supply stores to scrub the surface. You can usually stop mildew past increasing exterior airflow in that area, trimming plants close to the house, and channeling water away with gutters and downspouts. If the area is tough to air out, you tin can get mildewcide additives for your cease glaze of paint.
Some other trouble is chalking, where old paint surfaces go powdery. This is natural for sometime paints, just you'll have to power wash or scrub the surface and exercise some low-cal sanding to remove the chalking earlier applying paint.
Required Tools for this Projection
Have the necessary tools for this DIY projection lined up before yous start—you'll relieve time and frustration.
Carbide bract and a ability washer (rental).
Originally Published: June 20, 2022

How Fo Repair Wood House Siding Before Painting,
Source: https://www.familyhandyman.com/project/painting-preparation-making-paint-last-prepare-the-surface/
Posted by: schradersammat.blogspot.com
0 Response to "How Fo Repair Wood House Siding Before Painting"
Post a Comment